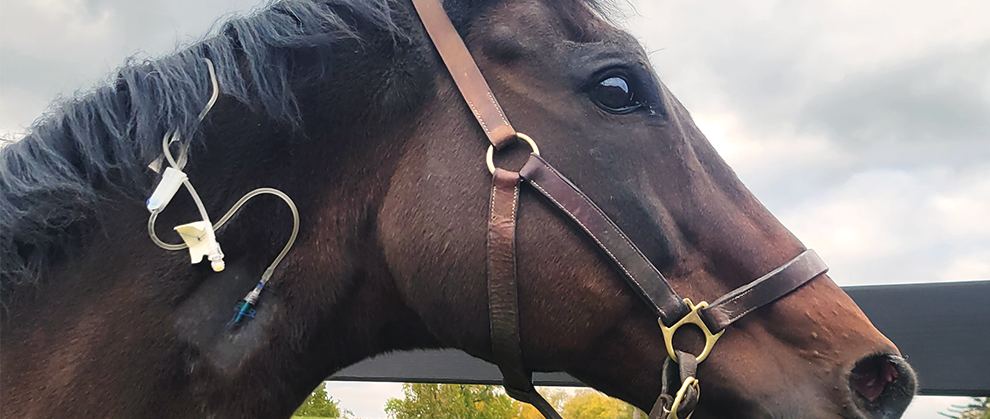

Intravenous catheters (IVCs) in equine patients are placed for many indications, including administration of intravenous medications and fluids, serial blood sampling, and euthanasia. This technical skill is well within the practical scope of the credentialed veterinary technician, and they should be able to make decisive and educated decisions on the placement location and types of materials used. Risks during placement include arterial puncture and maintaining the integrity of the IVC to reduce complications, including thrombophlebitis, embolus, and sepsis.
Take-Home Points
- Multiple gauges and lengths of over-the-needle IVCs are on the market; selection is based on patient size and intended use.
- The jugular vein is the most common vein to catheterize; the cephalic and saphenous veins are also available, as are the lateral thoracic veins.
- Restraint is paramount to placement success. Fractious and needle-shy horses will benefit from sedation.
- Adherence to aseptic technique during placement preparation will decrease IVC-related complications and extend the life of the IVC.
- A controlled, decisive puncture of the IVC through the skin and into the jugular vein is the most strategic method for successful placement, as is the use of a “clean hand, dirty hand” placement style when threading the IVC off of the stylet.
Placement of intravenous catheters (IVCs) in equine patients is an important technical skill that can be mastered by credentialed veterinary technicians working in both ambulatory and hospital practices (VIDEO 1). This skill is typically relegated to doctors of veterinary medicine but is within the general scope of practice for a credentialed veterinary technician, if in alignment with their state practice act.1,2 Utilizing veterinary nurses/technicians for comprehensive nursing care allows veterinarians to focus exclusively on tasks only they are licensed to perform. To underutilize equine veterinary nurses is a misuse of their time and financially impacts practices.
IVCs are used for administration of anesthetic drugs, fluids, medications, and euthanasia solution and for collection of blood samples.3
Box 1. Care of the IVC
- Flush IVC q4-6h or hep-lock for 24 hours.
- Wipe all injection ports with isopropyl alcohol before insertion of the needle (FIGURE 1).4
- Change injection port daily.
- Discard heparinized saline syringe after each use.
- Check IVC for complications when giving medications, adjusting fluids, or performing a physical exam.3,5

Figure 1. Wiping the injection port with isopropyl alcohol before needle insertion.
Veterinary nurses/technicians should be able to identify the indications following the orders of the veterinarian for IV catheterization, assemble the necessary equipment, follow appropriate techniques for IVC placement, monitor and maintain IVCs (BOX 1), and recognize potential complications of IVCs in the equine patient (TABLE 1).


Figure 2. Thrombophlebitis in an equine patient.
Step 1: Consider IVC Placement
When selecting the materials for IVC placement, the veterinary nurse/technician must consider the purpose of the IVC, the size of the patient, as well as the patient’s vital status. Cost considerations can be made, when appropriate.
An over-the-needle style IVC is most commonly used and will be the focus of this article and techniques described. For most standard-sized adult horses, 14-gauge IVCs that are 5.25 inches long are appropriate.3 Adult patients presenting with dehydration and hypovolemia will need venous access for rapid fluid bolus; therefore, large-gauge catheters (10 to 12 gauge) are best suited for rehydration. There are IVCs that are 16 gauge and 3.5 to 5.5 inches that are better suited for ponies, smaller donkeys, and neonates.
IVCs made from Teflon or similarly stiff materials are easy to insert, reasonably priced, and ideal for elective procedures. Due to the stiffness of the material makeup of a short-term catheter, they should only be left in place for up to 3 days; otherwise, IVC-related complications might occur.3 Polyurethane is a common component of IVCs that can be used for up to 2 weeks, making them ideal for use in hospitalized patients requiring frequent IV drug and fluid administration.
Step 2: Determine the Location for Catheterization
The jugular vein is the most common location for placement of an IVC. It is the most accessible vein in equids. The cephalic and saphenous veins are commonly catheterized to accommodate regional limb perfusions or supplement venous access during anesthetic procedures.3,5
The right and left jugular veins lie within the jugular grooves, ventral to the palpable cervical vertebra and dorsal to the trachea.5 The vein is distended with manual pressure on the caudal jugular groove (FIGURE 3). The catheter site should be placed in the upper one-third of the neck because the jugular vein is most superficial in this area and the common carotid artery is located deeper as it courses toward the skull base, with the omohyoid muscle separating the 2 vessels.

Figure 3. Applying manual pressure on the caudal jugular groove to distend the vein.
Step 3: Assemble the Materials
Proper restraint is paramount, including ensuring that the head is straight and level to or higher than the withers. Use a well-fitting halter and lead rope, and employ a lead shank or twitch if warranted. If the patient is fractious, sedation should be administered.3 Materials can be assembled on a mobile cart or table (FIGURE 4A) and should be prepared in advance to prevent aggravation or distraction from the horse.
- First-phase prep:
- Clippers
- Nonsterile gauze squares
- 2% chlorhexidine scrub
- 9% sodium chloride rinse
- Exam gloves
- Local anesthetic:
- 1 to 2 mL local anesthetic, patient size dependent
- 3-mL syringe
- 25- or 22-gauge needle
- Second-phase prep:
- Sterile gloves
- Sterile gauze squares
- Sterile 0.9% sodium chloride rinse
- Sterile (unopened bottle) 2% chlorohexidine scrub
- Flush:
- Heparinized saline (1000 IU heparin in 0.9% sodium chloride)
- 20-mL syringe
- 20-gauge needle
- Selected IVC
- Securing the IVC:
- Extension set or T-port
- Injection port
- 2-0 monofilament, nonabsorbable suture, straight needle
- Scissors
- 1-inch white medical tape
Draw heparinized saline into a 20-mL syringe with a 20-gauge needle and 1 to 2 mL of a local anesthetic into a 3-mL syringe with a 22- or 25-gauge needle attached. A smaller needle will result in less reaction. The first-phase prep should be made using gauze squares, 2% chlorohexidine diluted with 0.9% sodium chloride and a 0.9% sodium chloride rinse. The sterile supplies should be opened once the second-phase prep is to be performed. A sterile second-phase prep is strongly recommended, as the adherence to aseptic technique is considered a gold-standard practice in both small animal and human medicine.7,8 Recognizing the importance of asepsis will prevent IVC-related complications (TABLE 1).
Practice preference and commercial availability will determine extension set selection. Extension sets come in a variety of lengths, ranging from 7 to 30 inches and may be in the style of a T-port (FIGURE 4B). The extension set lumen size must be comparable to the lumen size of the IVC. An injection port, either with a rubber septum for needle puncture or a needleless clave, should be attached to the extension set, and heparinized saline should be flushed through the extension set.
Step 4: Prepare the Site
Distend the jugular vein with digital pressure, and visualize the area to be catheterized. A small square should be clipped over the area (FIGURE 5A). Gauze sponges should be placed in containers for scrub and rinse.
- One container should contain gauze soaked with 2% chlorhexidine and diluted with 0.9% sodium chloride for scrub.
- The other container should contain gauze soaked with 0.9% sodium chloride for rinse.
Wearing examination gloves, perform a preliminary scrub.5 Then, subcutaneously inject local anesthetic over the anticipated insertion site (FIGURE 5B). If an extension set is used and will be sutured to the neck, inject local anesthetic approximately 2 inches dorsal to the jugular groove.
Prepare the sterile materials for the secondary prep by opening the sterile gauze containers.
- Aseptically pour 2% chlorhexidine and sterile 0.9% sodium chloride over the gauze to be used as scrub.
- Aseptically pour sterile 0.9% sodium chloride over the gauze to be used as a rinse.
Don sterile gloves and perform a secondary prep, using the sterile materials (FIGURE 6).

Figure 6. Performing a secondary prep.
Step 5: Place the IVC
To maintain aseptic technique, a “clean hand, dirty hand” method is described in this article. It ensures the hand that is contaminated by venous distention will be positioned farthest from the important structures of the IVC while threading it. The clean hand is the dominant hand, and the dirty hand is the nondominant hand. Moving forward, they will be referred to as such.
An assistant should open the package of the IVC for the veterinary nurse/technician to retrieve it. Discard the protective plastic sheath surrounding the IVC. The clean hand should hold the hub of the IVC between the thumb and middle finger, while the dirty hand rotates the stylet so the bevel is facing up. If wings are present with the specific brand, the hub of the IVC should be rotated to where the wings are facing the neck. The IVC should be held horizontally as the heparinized saline syringe is attached to the stylet to flush (FIGURE 7A). The pointer finger of the clean hand should be placed over the stylet to prevent the saline from flowing out (FIGURE 7B). The pointer finger will also drive the needle through the skin and should not be removed during the placement of the IVC unless to check for patency.
With the dirty hand, distend and visualize the vein. With the clean hand, place the bevel against the skin, pointing caudally in the center of the local block (FIGURE 8). The IVC should be in line with the jugular groove, neither pointing ventral nor dorsal to the direction of the jugular vein and positioned at a 45-degree angle to minimize “burrowing” through the subcutaneous space.3

Figure 8. The dirty hand is used to distend and visualize the vein while the clean hand places the bevel against the skin.
Use a confident and controlled puncture to pierce the skin. Check placement by lifting the pointer finger from the stylet. If blood flows out of the stylet, the IVC is in the jugular vein (FIGURE 9A). Replace the pointer finger over the stylet, drop the angle of the IVC nearly flat against the skin, and advance it approximately 5 to 10 mm to seat the IVC within the vein (FIGURE 9B).3,5 Lift the pointer finger once again to ensure that blood flows from the stylet.
The dirty hand should move from the vein to the stylet to hold its position. Use the clean hand to thread the hub of the IVC down the stylet until it is seated fully in the vein (FIGURE 9C). Only then should the stylet be removed from the lumen of the IVC. Ensure patency by redistending the vein; dark blood will flow from the hub of the IVC (FIGURE 10).

Figure 10. After removing the stylet, patency is ensured by redistending the vein.
Tips for troubleshooting IVC placement problems can be found in TABLE 2.

Step 6: Secure the IVC
The extension set should be firmly attached to the hub of the IVC. Secure the IVC in place by suturing the hub and extension set to the skin.3,5 The author recommends the initial suture at each point be a surgeon’s throw, followed by 3 overhand knots, as this snugly secures the IVC to the skin. Attachment points might vary between brands and may include a notch on the body of the hub, the hole of each wing, and proximal to the Luer lock of the extension set. Create a butterfly out of 1-inch white medical tape, and place it on the extension set in such a way that the set curls caudally from the insertion site. This prevents the extension set from pulling or dangling. Using the same technique as described above, suture the butterfly to the neck approximately 2 inches dorsal to the insertion site (FIGURE 13). The sutures should be snug to prevent movement of the IVC. The free portion of a longer extension set should be wound through a portion of braided mane.

Figure 13. A butterfly created out of medical tape is placed on the extension set and sutured to the neck to prevent the set from pulling or dangling.
Summary
Catheterization in an equine patient is a task best relegated to a credentialed veterinary technician, when allowed by state practice acts. With exposure and experience, they will be able to select the correct supplies and execute the proper technique with efficiency and care to avoid possible complications.
Into Practice
- Prepare all materials in advance, including securing proper restraint and possible sedation.
- Use a quick, controlled puncture through the skin and into the vein at a 45-degree angle.
- Thread the IVC down the stylet with the clean hand, while holding the stylet still with the dirty hand.
- Firmly secure the extension set to the IVC, and place right sutures in specific locations on the hub of the IVC and extension set.
- Closely monitor the IVC for complications, and flush the IVC with heparinized saline q4-6h.